Thirdpart Pixel & PostBack Last update : Jul 29, 2020
Learn how to deal with ThirdPart Pixel & PostBack.
Introduction
ThirdPart Pixel & Postback allow you to send some envent conversion from AmaretAds to another partner.
For example, if you work with a Publisher who has his own platform, you can send her all event for a given campaign.
Access to ThirdPart Manager
You can access to ThirdPart Manager from 2 ways :
- From Menu : in "Campaigns" > "Pixel & PostBack"
- From a Campaign : in "Pixel & PostBack" tab on a given Campaign
This part is accessible for Admin, for Advertiser (Only on his own campaign), for Publisher (Only on campaign with a validated candicacy).
Fields details
To manage your ThirdPart, AmaretAds allow you to use some fields to do what you want with this Pixel/PostBack.
| Field | Mandatory | Allow Admin | Allow Advertiser | Allow Publisher | Informations |
|---|---|---|---|---|---|
| Advertiser | No | Choose an Advertiser for this pixel. This allow you define a Campaign in next field. If alone without define Campaign, Publisher and/or Support, this is a global Pixel/PostBack for given Advertiser. | |||
| Campaign | No | Choose a Campaign for this pixel. This allow you define a Conversion Goal in an other field. If alone without define Publisher and/or Support, this is a global Pixel/PostBack for given Campaign. | |||
| Publisher | No | Choose a Publisher for this pixel. This allow you define a Support in next field. If alone without define Campaign, Advertiser and/or Support, this is a global Pixel/PostBack for given Publisher. | |||
| Support | No | Choose a Support for this pixel. If alone without define Campaign and/or Advertiser, this is a global Pixel/PostBack for given Support. | |||
| Conversion Goal | No | Choose a Conversion Goal according to a given campaign if needed. | |||
| Type | Yes | Choose a Pixel/PostBack type : "img" for an image pixel, "html" for javascript, iframe, etc and "postback" for server side pixel. | |||
| Conversion type | Yes | Choose on what conversion type the pixel need to be fire. | |||
| Status | Yes | Define pixel status. Only Admin can activate a ThirdPart, for other users status is pending by default and can't be changed. | |||
| Content | Yes | Here you can put the Pixel/PostBack. You can use some system macros, to learn more about that please refer to "How Parameters & Macros works" and "System & Custom Macros" articles. |
Note
As all entities fields are not mandatory, you can make any combination you want. For example, if you define an Advertiser and a Publisher, pixel was fire for every campaign of the given Advertiser and the given Publisher.
Deal with Specifics ThirdPart
AmaretAds permit you to use thirdpart you want, but we also propose you some specifics thirdpart to help you.
FaceBook PostBack/S2S
With AmaretAds, you can integrate a server side pixel with FaceBook. Here we see how to do that.
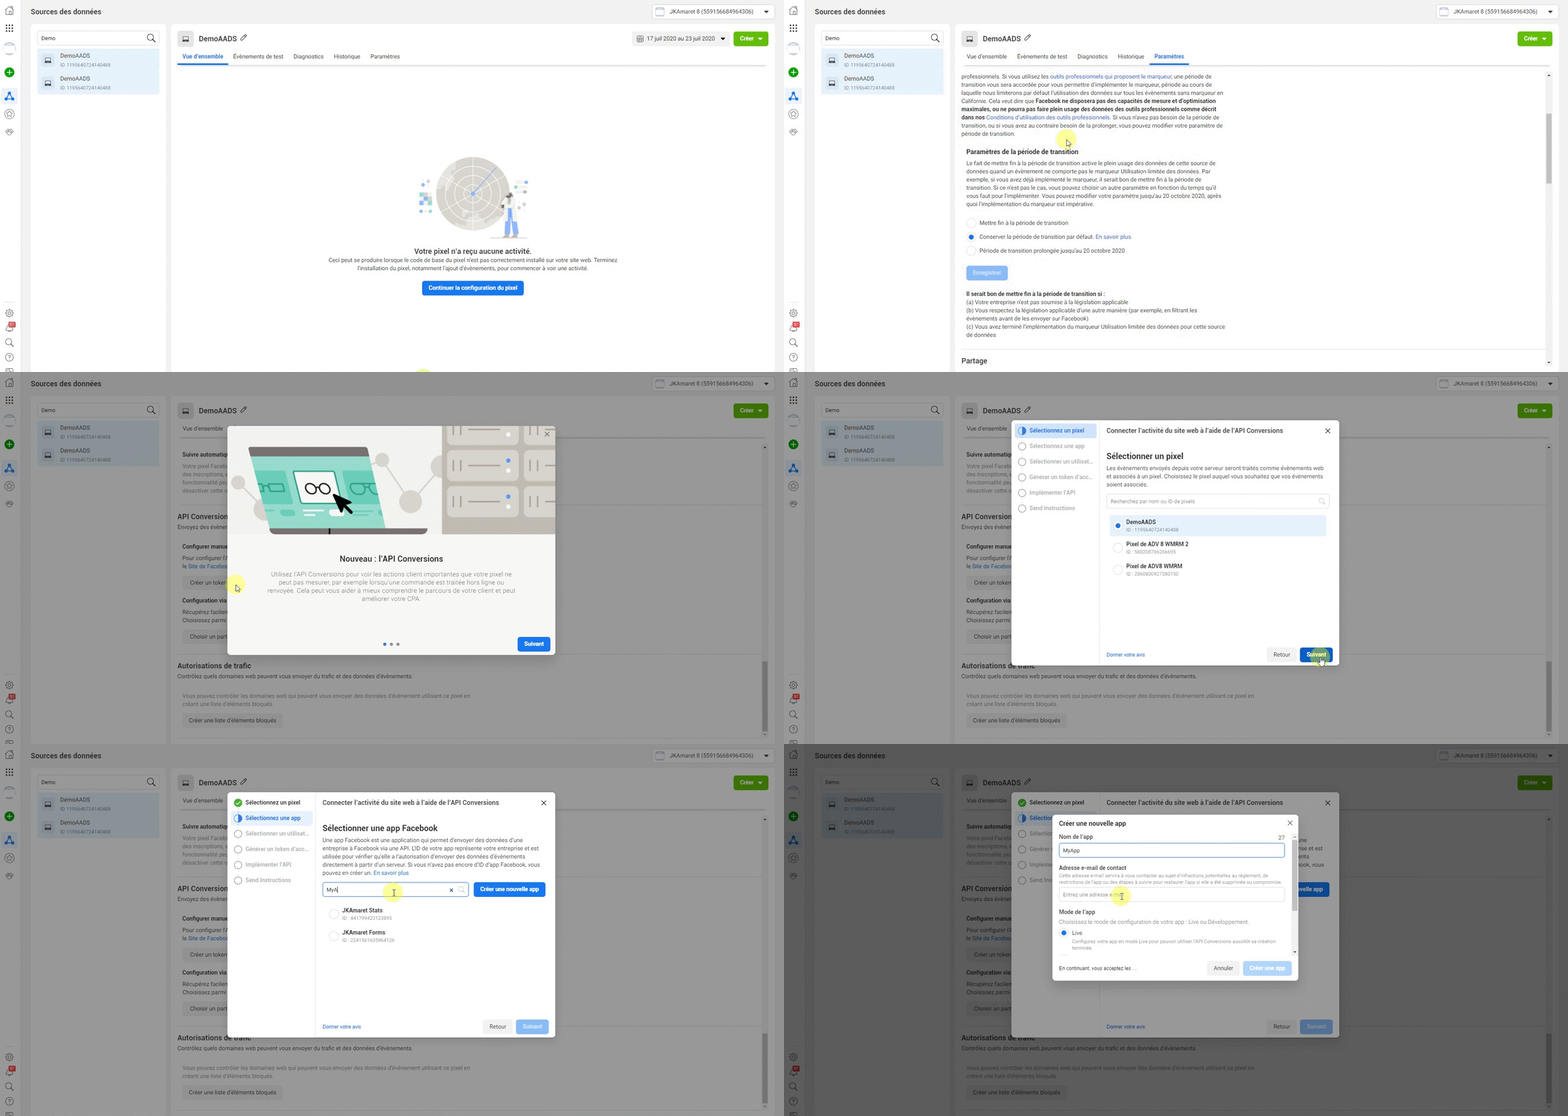
Firt, you need to get the pixel ID on facebook and a specific access token.
To do that, got to your Business Manager on FaceBook.
- Visit "Business Manager" > "Events Manager" > "Pixels"
- Choose the pixel you want to use (You can find Pixel ID below Pixel name)
- Go to "Parameters" tab
- Scroll and find API Conversions and click on "Create an Access Token"
- Follow FaceBook instructions to get your Access token

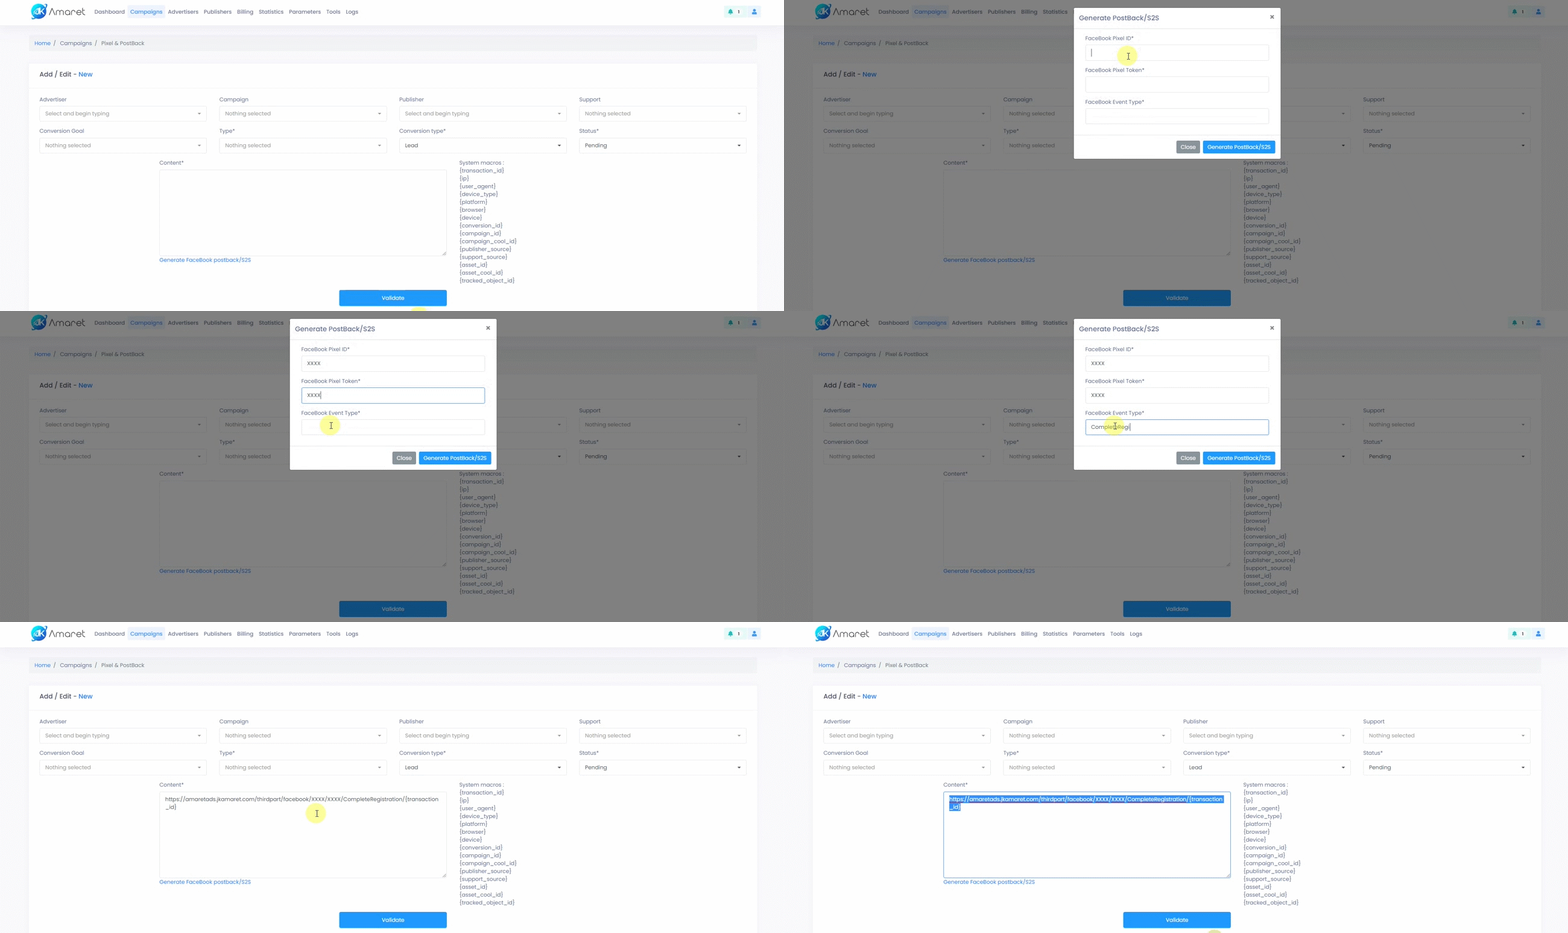
Now you have your Pixel ID and Access Token, go to Pixel & PostBack page and click on the link "Generate FaceBook PostBack/S2S" below Content field.
A popup appear with 3 fields :
- FaceBook Pixel ID : Put Pixel ID here.
- FaceBook Pixel Token : Put access token here.
- FaceBook Event Type : Here you need to define event you want to get back on FaceBook (AddPaymentInfo, AddToCart, AddToWishlist, CompleteRegistration, Contact, CustomizeProduct, Donate, FindLocation, InitiateCheckout, Lead, Purchase, Schedule, Search, StartTrial, SubmitApplication, Subscribe, ViewContent)
When all fields are correct click on "Generate PostBack/S2S" button. This will put the correct link in content field.

